 Save
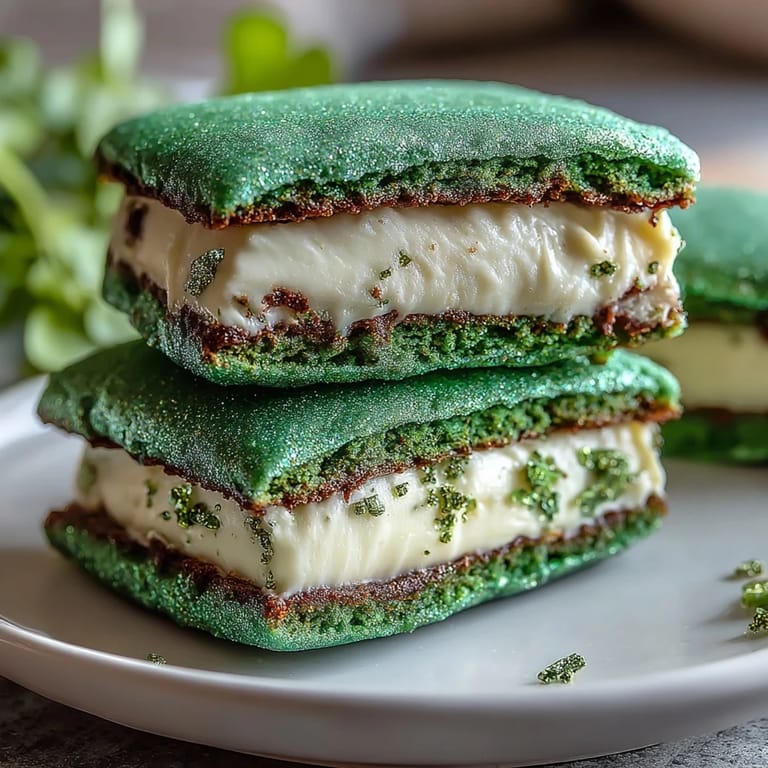
Save My kitchen smelled like butter and sugar the morning my neighbor knocked on the door with a box of green sanding sugar she'd impulse-bought at the grocery store. She wanted to know if I could use it before St. Patrick's Day, and somehow that one jar sparked the idea for these sandwich cookies. They're soft, pillowy, and just bright enough to feel festive without tasting artificial. The frosting layer in the middle is what transforms them from cute cookies into something people actually crave.
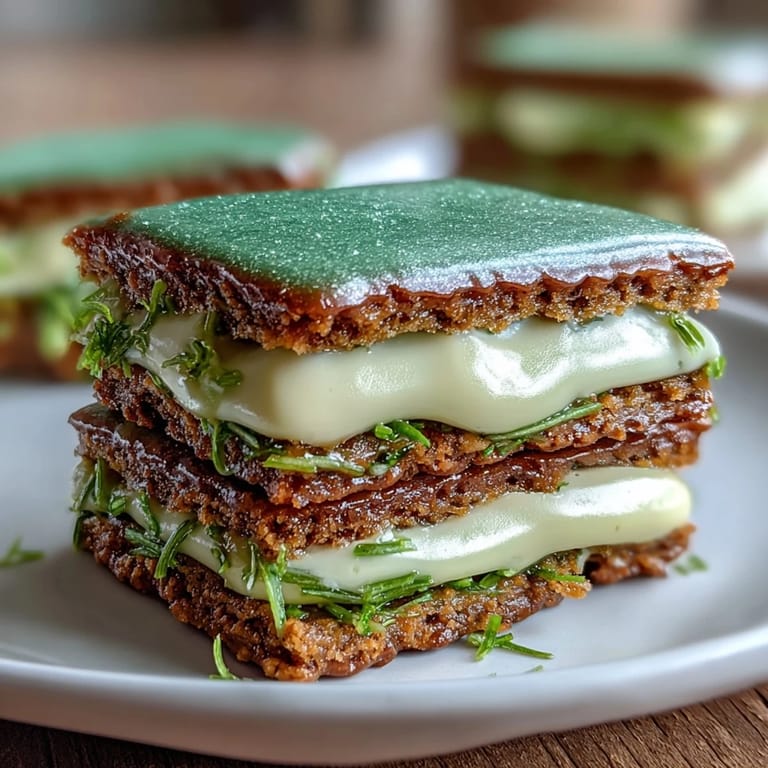
I made these for my daughter's school St. Patrick's Day potluck, and watching her classmates actually get excited about cookies instead of just grabbing them made me realize how much the sparkly sugar coating matters. It catches the light in a way that makes people pause and notice them. She came home with an empty container and asked if we could make them every year now.
Ingredients
- All-purpose flour (2 1/2 cups): The backbone of your cookies, and measuring by weight gives you the most consistent results every time.
- Unsalted butter (1 cup, softened): Room temperature is non-negotiable here because cold butter won't cream properly and your cookies will be dense instead of fluffy.
- Granulated sugar (1 cup): This is what makes the cookies tender, so don't skip it or reduce it thinking you're being healthier.
- Baking powder (1/2 tsp): Just enough to give the cookies a gentle lift without making them cake-like.
- Green gel food coloring: Use gel, not liquid, because it won't dilute your dough and you'll get that true, vivid green that photographs beautifully.
- Green sparkling or sanding sugar (1/2 cup): This is what makes them feel special and festive, so don't use regular granulated sugar as a substitute.
- Egg (1 large) and vanilla extract (2 tsp): These bind everything together and make the cookies taste rich and buttery instead of bland.
- Almond extract (1/2 tsp, optional): This is optional but adds a subtle complexity that makes people ask what the secret ingredient is.
- Unsalted butter for frosting (1/2 cup): Again, soft butter is crucial or your frosting will have weird lumps no matter how much you beat it.
- Powdered sugar (1 3/4 cups, sifted): Sifting removes lumps and makes your frosting smooth and spreadable without extra effort.
- Milk (1 1/2 tbsp): This loosens the frosting to the right consistency, though you can use cream if you want it richer.
Tired of Takeout? 🥡
Get 10 meals you can make faster than delivery arrives. Seriously.
One email. No spam. Unsubscribe anytime.
Instructions
- Prep your workspace:
- Preheat your oven to 350°F and line two baking sheets with parchment paper, then take your butter out so it's genuinely soft by the time you need it. This small step prevents the frustration of trying to cream cold butter.
- Mix your dry ingredients:
- In a medium bowl, whisk together flour, baking powder, and salt, then set it aside and forget about it for a moment. This prevents lumps and ensures even distribution of the leavening agent.
- Cream butter and sugar:
- Beat your soft butter and sugar together for about 2 to 3 minutes until it looks pale, fluffy, and slightly whipped, which is what you're looking for. Stop when it looks almost cloud-like and significantly lighter than when you started.
- Add your wet ingredients:
- Beat in the egg, vanilla extract, and almond extract if you're using it, making sure everything is fully combined before moving on. The mixture should look smooth and slightly glossy at this point.
- Add the color:
- Drop in your green gel food coloring and beat until the dough reaches the shade of green you want, which might take more color than you expect. Trust your eye rather than the package instructions because gel is concentrated.
- Bring it together:
- Gradually add your dry ingredients to the wet mixture, stirring until a soft dough forms without any streaks of flour visible. Don't overmix or your cookies will be tough instead of tender.
- Prepare for baking:
- Scoop tablespoon-sized portions of dough and roll them into balls, then coat each one generously in green sparkling sugar until they're completely covered. Place them 2 inches apart on your prepared sheets and gently flatten each ball with the palm of your hand.
- Bake until perfect:
- Bake for 9 to 11 minutes, watching until the edges are set but the very centers still look slightly underdone. They'll continue to cook on the pan after you pull them out, so remove them just before you think they're done.
- Cool completely:
- Let the cookies cool all the way on a wire rack before you even think about touching them. Warm cookies are fragile and will crumble if you try to fill them too soon.
- Make your frosting:
- In a clean bowl, beat your soft butter until it's creamy, then gradually add sifted powdered sugar, milk, vanilla, and a tiny pinch of salt. Beat until the frosting is fluffy and spreadable, about 2 to 3 minutes of continuous beating.
- Assemble your sandwiches:
- Spread or pipe a generous layer of frosting onto the flat side of half your cookies, then top each with another cookie to create a sandwich. If you want extra sparkle, roll the frosted edges in more green sparkling sugar right after assembly.
 Save
Save My husband actually sat down and ate three of these in a row without getting up, which for him is a big deal because he's usually more of a savory person. Seeing him enjoy something I'd made specifically for a holiday felt like the whole batch was worth the effort. Food doesn't have to be complicated to feel like a celebration.
Why Green Gel Food Coloring Changes Everything
The first time I made green cookies, I used liquid food coloring because it was what I had in the cabinet, and my dough turned out slightly wet and sticky. The cookies spread too thin and baked unevenly, and I spent the whole time annoyed with myself. When I switched to gel, it was like a light turned on because the dough stayed the right consistency and the color was so much more vivid and true.
Getting the Texture Exactly Right
The trick to these cookies staying soft is not baking them until they look completely done, which feels counterintuitive the first time you do it. They should look slightly underbaked in the center when you pull them out because residual heat will finish the cooking while they cool on the pan. I've made them overbaked before, and they turn into those hard, sad cookies that nobody really wants to eat.
Storage and Variations You Should Try
These keep beautifully in an airtight container at room temperature for up to three days, though honestly they rarely last that long in my house. You can add a few drops of peppermint extract to the frosting if you want a festive twist that tastes like the holidays. Here are a few other things I've discovered work great:
- Try replacing half the milk in the frosting with cream cheese for a slightly tangier filling that still feels festive.
- You can make the dough ahead, scoop it into balls, freeze them, and bake directly from frozen with just a couple extra minutes in the oven.
- If you don't have almond extract, vanilla alone is perfectly fine and the cookies taste just as delicious without the optional ingredient.
 Save
Save These cookies are the kind that makes people smile the moment they see them, and they taste good enough to justify the smile. They're festive without being complicated, and that's exactly what a good holiday recipe should be.
Recipe Questions & Answers
- → What gives these cookies their vibrant green color?
Green gel food coloring is used to achieve a bright, festive green without altering dough consistency.
- → Can I add other flavors to the cookies?
Yes, adding peppermint extract offers a refreshing twist suitable for festive occasions.
- → How should these cookies be stored?
Store in an airtight container at room temperature for up to three days to maintain freshness.
- → What texture can I expect from these cookies?
They bake until edges are set and centers stay soft, providing a tender and chewy bite.
- → Is the sparkling sugar just decorative?
Besides adding sparkle, the green sanding sugar gives a slight crunch and extra sweetness around the edges.