 Save
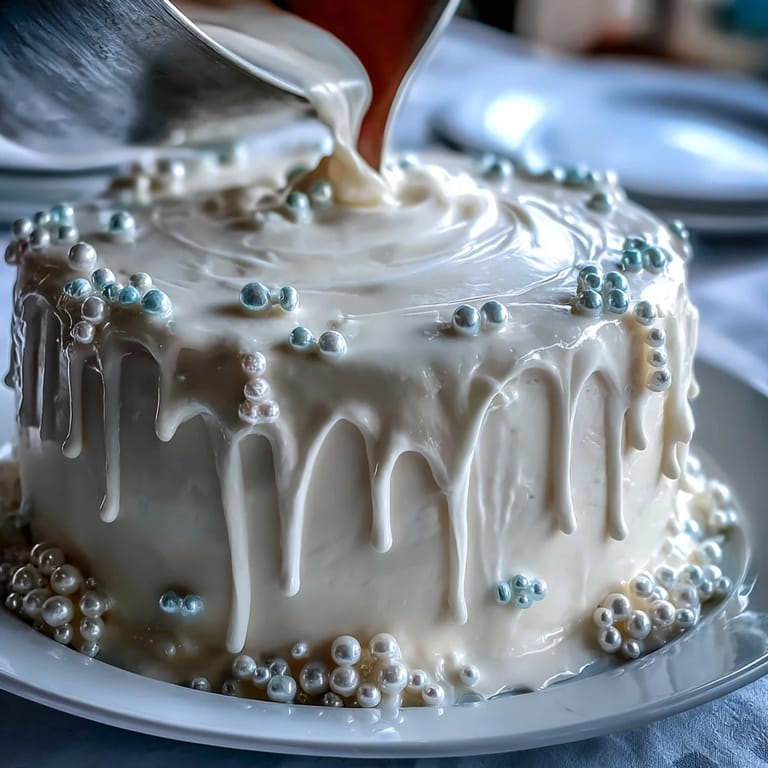
Save My hands were shaking slightly as I smoothed that first layer of pearl fondant across the cake—not from nerves about baking, but from the weight of what it represented. A young girl in our neighborhood was celebrating her First Communion, and her mother had asked if I could create something that felt both elegant and joyful. I'd made plenty of cakes before, but never one that needed to capture such a significant moment. The soft shimmer of pearl dust under kitchen light suddenly felt less like decoration and more like a small prayer in buttercream and sugar.
I'll never forget watching the fondant settle over that cake like fresh snow, how the light caught the pearl dust I'd brushed on, turning it into something that seemed to glow. The family gathered in the kitchen before the party, and the little girl's eyes went wide—that moment made every minute of prep work disappear. Sometimes the best part of baking isn't the eating; it's seeing something beautiful you've made become part of someone's memory.
Ingredients
- All-purpose flour: Three cups gives you structure without heaviness; make sure to measure by spooning and leveling, not scooping directly from the bag, which can pack the flour and make your cake dense.
- Baking powder: Two and a half teaspoons is your leavening agent—don't skimp, but also check the expiration date because old baking powder won't give you that tender crumb.
- Granulated sugar and softened butter: The creaming of these two is where your cake gets its tender texture; this isn't a step to rush, so spend a full three minutes letting the mixer do the work.
- Room temperature eggs: They incorporate more smoothly and create a finer crumb, so pull them from the fridge about thirty minutes before you start baking.
- Whole milk: It adds moisture and richness that keeps this cake tasting fresh even a day or two after baking.
- Powdered sugar for buttercream: Sift it before measuring so your frosting stays silky and lump-free, which is crucial for spreading under that delicate fondant.
- White ready-to-roll fondant: Two pounds covers a standard half-sheet pan; keep it sealed until you're ready to roll because fondant dries quickly once exposed to air.
- Pearl luster dust: This is the secret to that elegant shimmer—apply it with a dry brush and watch the fondant come alive with subtle light.
Tired of Takeout? 🥡
Get 10 meals you can make faster than delivery arrives. Seriously.
One email. No spam. Unsubscribe anytime.
Instructions
- Prepare your space and preheat:
- Get your half-sheet pan lined with parchment paper and your oven to 350°F while you gather ingredients; this small moment of organization makes everything that follows feel less frantic. A cool kitchen and ready tools mean you can focus on the mixing rather than scrambling.
- Combine your dry ingredients:
- Whisk the flour, baking powder, and salt together in a medium bowl and set it aside—this ensures even distribution of leavening throughout the cake. It's a small step that makes a real difference in how evenly your cake rises.
- Cream butter and sugar until fluffy:
- This takes about three minutes with a mixer, and you'll know it's ready when the mixture looks pale and light, almost like fluffy clouds. This is where you're incorporating air into the batter, which creates that tender crumb you're after.
- Add eggs one at a time with care:
- After each egg goes in, beat well before adding the next one—this prevents the batter from looking curdled or separated. Once all four eggs are in, mix in your vanilla extract.
- Alternate flour and milk in three additions:
- Start with flour, then milk, then flour again, ending with flour; this technique prevents overmixing, which would develop gluten and make your cake tough. Mix only until you see no white flour streaks, then stop.
- Bake until golden and set:
- Pour the batter into your prepared pan and smooth the top gently with a spatula, then bake for thirty to thirty-five minutes until a toothpick comes out clean. The kitchen will smell like vanilla and butter, warm and welcoming.
- Cool with patience:
- Let the cake rest in the pan for ten minutes before turning it out onto a wire rack to cool completely—rushing this step can cause crumbs and cracks. Complete cooling is essential before you add buttercream and fondant.
- Make your buttercream base:
- Beat softened butter until creamy, then gradually add your sifted powdered sugar along with milk, vanilla, and a pinch of salt, beating until the mixture is smooth and fluffy. This thin layer of frosting helps the fondant adhere and gives you a clean surface to work on.
- Spread buttercream evenly:
- Use an offset spatula to apply a thin, even layer across the entire cake, top and sides; this doesn't need to be thick, just smooth enough to give the fondant something to grip.
- Roll and drape your fondant:
- Dust your work surface lightly with powdered sugar, then roll the fondant to about one-eighth inch thickness—you'll feel the fondant soften slightly as you work it, which means it's pliable enough to drape. Carefully lift it over the cake and smooth it gently with your hands or a fondant smoother, working from the center outward to avoid air bubbles.
- Trim and decorate with intention:
- Once the fondant is smooth and draped, trim away excess with a small sharp knife or pizza wheel, then dust with pearl luster dust using a dry food-safe brush. If you're adding edible pearls or creating a design, brush lightly with water where they'll stick.
- Add shine if desired:
- A light brush of corn syrup mixed with just a touch of water gives the fondant an elegant gloss that catches the light beautifully. Work quickly and gently so you don't disturb the dust.
- Let everything set:
- Give the cake thirty minutes on the counter before serving so the fondant firms up and the decorations settle firmly in place.
 Save
Save There's something about watching someone's face light up when they see a cake you've made that transforms the whole experience from task to gift. This particular cake became part of a girl's memory of a day that mattered, and that's when baking stops being about technique and becomes something tender.
Why This Cake Works for Special Occasions
A sheet cake is forgiving in the best way—it feeds plenty of people, bakes evenly, and doesn't require the precision of tiered cakes or the worry of stacking. The fondant covering means you can bake it a day or even two days ahead, decorate it the morning of the event, and know it will look fresh and elegant without any last-minute stress. For celebrations where you want something that feels special without requiring you to spend the entire day in the kitchen, this is the cake that delivers on all fronts.
Working with Fondant Like a Pro
Fondant can seem intimidating if you've never worked with it, but once you understand how it behaves, it becomes almost meditative to use. The key is keeping your hands cool and moving deliberately—rush the smoothing and you'll create wrinkles, but take your time and the fondant will cooperate. One lesson I learned the hard way was that ready-to-roll fondant truly needs buttercream underneath to stick properly; without it, you'll struggle with air pockets and slipping.
Customizing the Look for Your Celebration
Pearl fondant is beautiful as-is, but the real magic happens when you personalize it with meaning—a fondant cross, tiny fondant chalice, or a border of sugar pearls can reference the occasion without overwhelming the elegant simplicity of the design. You can also experiment with different luster dusts; silver or gold dust would work beautifully, or even pastel colors mixed with pearl dust for a softer effect. The fondant is your canvas, and the cake underneath is strong enough to support whatever vision you have.
- Consider using edible markers to add initials or dates once the fondant has fully set—it's a personal touch that photographs beautifully.
- Fresh berries arranged on the cake at serving time add color and brightness that cuts through the richness of the cake and buttercream.
- If you're nervous about fondant the first time, practice rolling it out a day or two before the actual cake so the motion becomes familiar and your hands learn how much pressure to use.
 Save
Save This cake proves that elegant doesn't have to mean complicated, and memorable doesn't have to mean stressful. Bake it with care, and it will carry someone's joy into the world.
Recipe Questions & Answers
- → How do I prevent the fondant from cracking?
Ensure the cake is completely cooled and apply a smooth buttercream layer as a base. Roll fondant evenly to about 1/8-inch thickness to prevent cracking.
- → Can I substitute almond extract for vanilla?
Yes, substituting half the vanilla with almond extract adds a subtle nutty flavor that complements the sweetness.
- → What is the best way to apply the pearl luster dust?
Use a dry, food-safe brush to gently dust the fondant surface, enhancing shine without affecting texture.
- → How long should the cake rest before serving?
Let the decorated cake set for at least 30 minutes to allow the fondant and decorations to firm up.
- → Can this cake be prepared ahead?
Yes, bake the sheet cake one day in advance and wrap it tightly before decorating the next day.