 Save
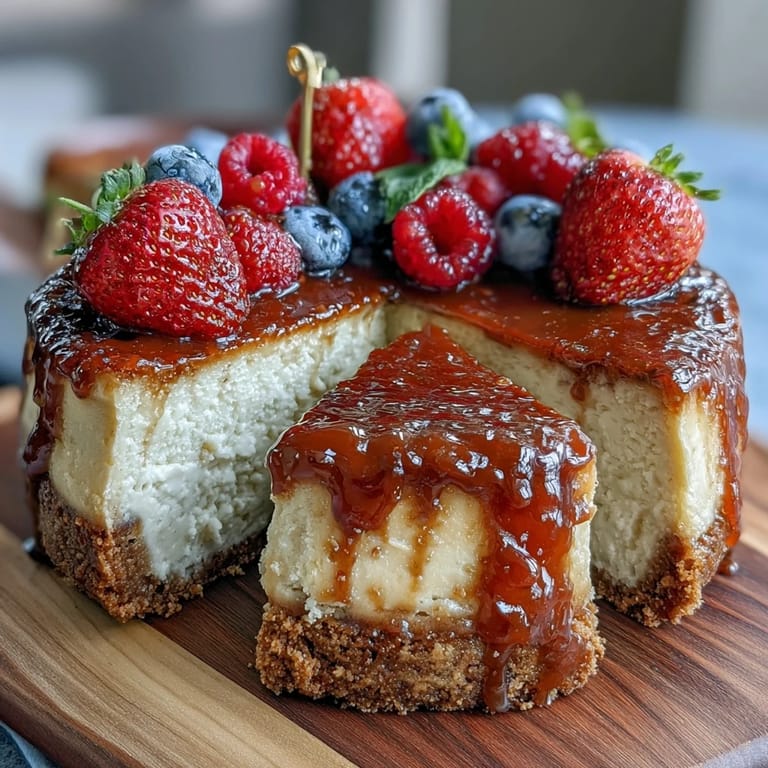
Save My sister called me three weeks before her graduation asking if I could bring something to the celebration dinner—something that would make people smile. I spent an afternoon experimenting with mini cheesecakes in my kitchen, thinking about how she'd always loved creamy desserts but wanted something fun and shareable. When I topped the first batch with fresh berries and added those little diploma picks, watching them stand proudly on each bite, I knew I'd found exactly what the moment needed. These aren't just desserts; they're edible congratulations, perfectly portioned and impossibly easy to make.
I'll never forget my mom's face when she tried one fresh from the fridge, still wearing her reading glasses. She took a bite, closed her eyes for a second, and said, 'These taste like you remembered what I taught you about balancing sweetness.' That moment made all the timing and testing worth it—these bites somehow carry more meaning than their tiny size suggests.
Ingredients
- Graham cracker crumbs: Use fresh ones if you can—blending actual crackers gives you better texture than the pre-packaged variety, though both work fine in a pinch.
- Granulated sugar (for crust): This adds just enough sweetness to balance the butter without overpowering the cream cheese layer that comes next.
- Unsalted butter, melted: Melting it first means the crust mixture will combine evenly and bake into a cohesive base.
- Cream cheese, softened: Don't skip the softening step—cold cream cheese will create lumps and make your filling grainy instead of silky.
- Granulated sugar (for filling): Beat this with the cream cheese for at least a full minute until the mixture looks almost fluffy; this aerates the filling.
- Large egg: This binds everything together and helps the bites set properly without becoming rubbery.
- Vanilla extract: A teaspoon gives warmth without announcing itself; it lets the cheese flavor shine.
- Sour cream: This ingredient taught me something—it adds tang that makes the cheesecake taste less cloying and more sophisticated than you'd expect from a bite-sized dessert.
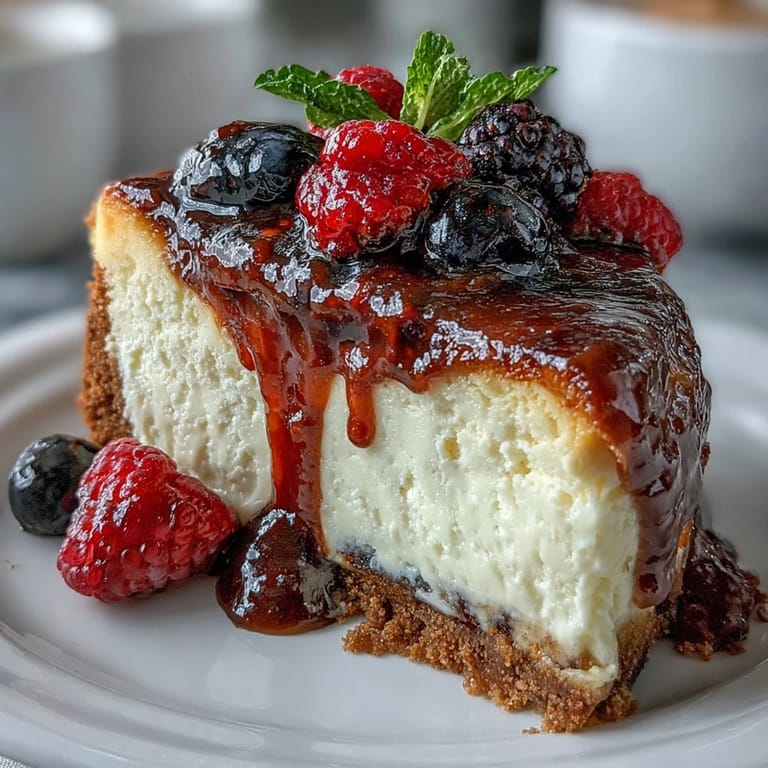
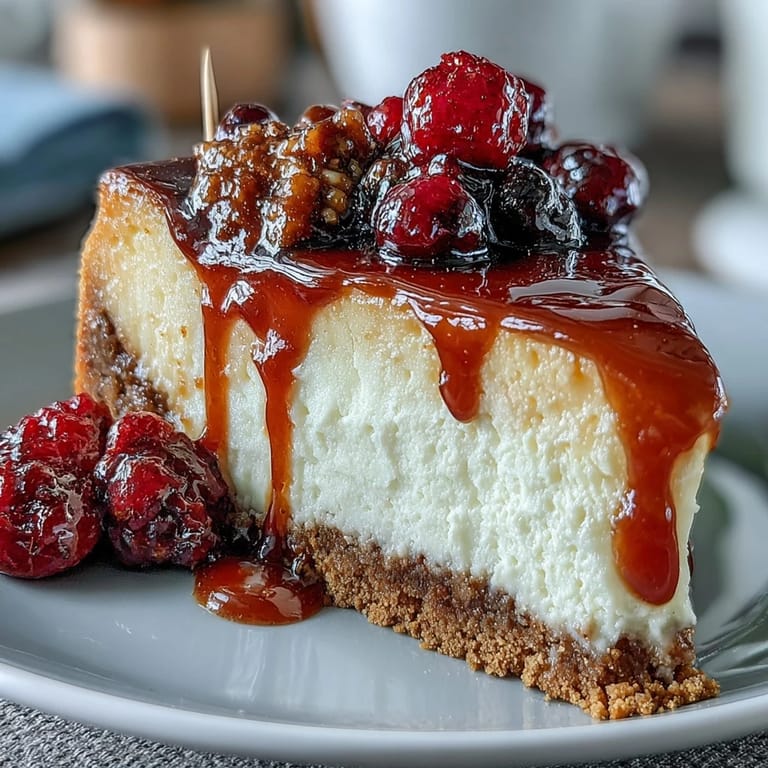
- Fresh mixed berries: I learned the hard way to dice them small so they don't slip off the rounded tops; larger pieces tend to roll.
- Fruit preserves (optional): A tiny brush of warmed preserves gives these a bakery-quality shine that makes them look like you spent hours on each one.
- Graduation diploma picks: These transform the moment from 'nice dessert' to 'celebration centerpiece'—search online or make your own with cardstock and twine.
Tired of Takeout? 🥡
Get 10 meals you can make faster than delivery arrives. Seriously.
One email. No spam. Unsubscribe anytime.
Instructions
- Prep your station:
- Preheat your oven to 325°F and line a 24-cup mini muffin pan with liners—this temperature bakes the bites gently so the centers stay creamy instead of drying out. Having everything ready before you start mixing is the difference between a calm baking session and a rushed one.
- Build the crust:
- Toss graham cracker crumbs, sugar, and melted butter together until the mixture looks like wet sand, then press about a teaspoon firmly into each liner. After 5 minutes in the oven, they'll smell toasty and feel set but still tender—this slight pre-bake keeps them from getting soggy later.
- Create the filling:
- Beat softened cream cheese and sugar until smooth (listen for the mixer to stop sounding grainy), then add the egg, vanilla, and sour cream, mixing just until combined. Overmixing introduces air bubbles that can cause the tops to crack, so stop as soon as everything looks uniform.
- Fill and bake:
- Spoon about a tablespoon of filling over each crust and smooth the top gently—these little mounds will puff up just slightly as they bake. At 13 to 15 minutes, they should jiggle just slightly in the center when you nudge the pan; this means they're set but still creamy.
- Cool and chill:
- Let them rest in the pan for 15 minutes so they firm up enough to move, then transfer to a wire rack before refrigerating for at least an hour. The chilling time is non-negotiable—it's when the texture becomes truly cheesecake-like instead of just creamy filling.
- Dress them up:
- Right before serving, crown each bite with a few diced berries and add a tiny brush of warmed preserves if you want them to gleam. Insert the diploma picks at an angle so they look jaunty and celebratory, not stiff.
 Save
Save I brought these to my friend's garden party where her teenage daughter had just gotten into her dream college, and watching three generations of family members gathered around the dessert table, each one taking a bite and grinning at the diploma picks, reminded me that sometimes the smallest foods carry the biggest celebrations. Food has a way of holding moments, and these little cheesecakes held that one perfectly.
Making Them Gluten-Free and Allergy-Friendly
Swapping regular graham crackers for gluten-free versions gives you identical flavor and texture—the bites stay just as crispy on the bottom and creamy on top. If you're serving people with dairy allergies, a combination of dairy-free cream cheese and coconut sour cream can work, though the texture shifts slightly toward mousse-like; the trade-off is usually worth it when someone gets to enjoy the celebration dessert alongside everyone else.
Flavor Variations That Still Feel Celebratory
I've added lemon zest to half a batch to brighten the filling, and the citrus cuts through the richness in a way that makes people take second bites without thinking. Chocolate swirled into the filling or drizzled on top feels more decadent, perfect if your graduate loves bold flavors, though I find the fruit topping keeps the overall feel light and summery.
Storage and Make-Ahead Tips
These keep refrigerated for up to three days, which means you can bake them the night before a party and spend the morning on other things. I've found that storing them in a shallow airtight container with parchment between layers prevents them from sticking together, and they're actually even better on day two once the flavors have melded slightly.
- Make the crusts and filling a day ahead, then assemble and bake the morning of your event.
- Skip the berries and diploma picks until just before serving if you're transporting them anywhere.
- Bring them in their liners so guests can grab one without needing a plate or fork.
 Save
Save These cheesecake bites became my go-to celebration dessert because they prove that something small can feel significant when it's made with care. Whether it's a graduation, promotion, or just a moment worth marking, they remind everyone that you took time to create something special.
Recipe Questions & Answers
- → What ingredients create the crust for these bites?
The crust combines graham cracker crumbs, granulated sugar, and melted unsalted butter, baked briefly to form a firm base.
- → How long should the bites chill before serving?
A minimum of one hour in the refrigerator allows the filling to set properly and enhances the texture.
- → Can I customize the topping on these bites?
Yes, fresh mixed berries are used by default, but you can add a light brush of fruit preserves or swap berries for other fresh fruit pieces.
- → What alternatives exist for gluten-free versions?
Using gluten-free graham crackers instead of traditional ones makes these bites suitable for a gluten-free diet.
- → How do diploma picks enhance the presentation?
The diploma picks add a festive touch, making them ideal for graduation celebrations and easy to serve as handheld treats.
- → Is the filling texture dense or creamy?
The filling is smooth and creamy, blending cream cheese, sugar, egg, vanilla, and sour cream for a balanced richness.