 Save
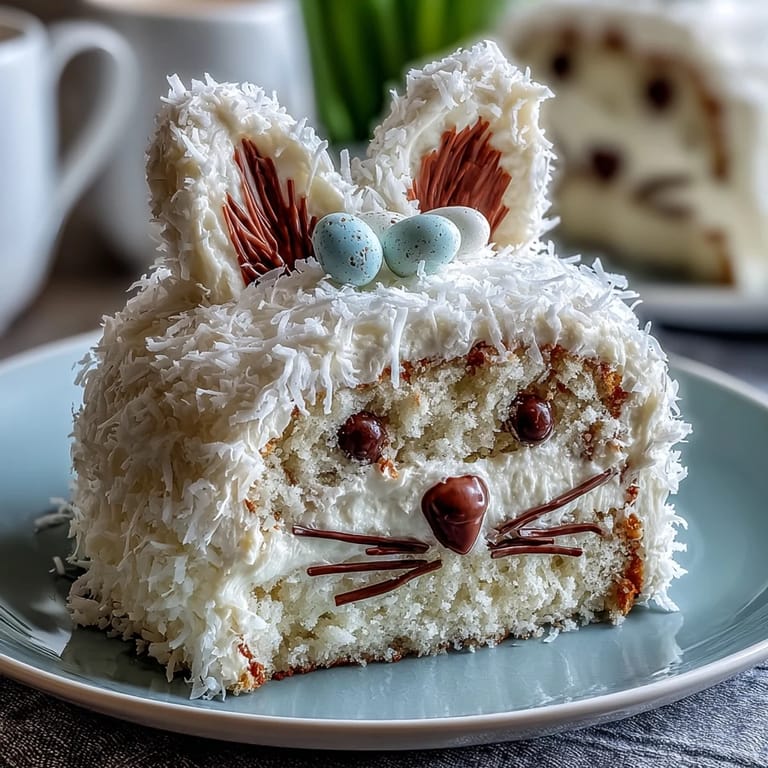
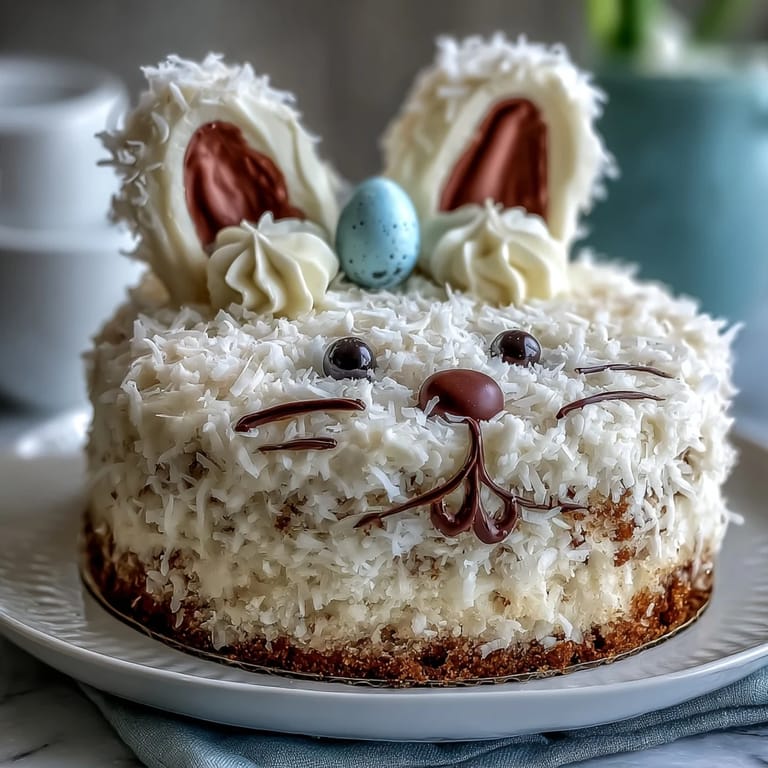
Save My daughter once asked if Easter bunnies were real, and I thought the best answer would be to bake one into existence. This Easter Bunny Cake became our answer that year, a fluffy vanilla creation with coconut frosting so inviting that the whole family gathered around the kitchen island just to watch me assemble it. The moment her face lit up when she saw the licorice whiskers go on, I knew this cake was worth every minute of the preparation.
I remember standing in my kitchen on Easter morning, powdered sugar dusting my apron, when a neighbor stopped by and gasped at the bunny taking shape on my counter. She stayed for coffee and ended up helping me press coconut into the frosting, and we laughed about how something so whimsical could bring two people closer. That cake became less about the eating and more about the hands that made it together.
Ingredients
- All-purpose flour (2 ½ cups): The foundation of a tender crumb; sifting it twice ensures no lumps hide in your batter and your cake stays light as clouds.
- Baking powder (2 ½ tsp): This is your lift and rise, so check the expiration date because old baking powder will leave you with a disappointingly dense cake.
- Salt (½ tsp): A tiny pinch that makes the vanilla sing and balances the sweetness in ways you won't consciously taste but absolutely will miss if forgotten.
- Unsalted butter (1 cup for cake, 1 cup for frosting): Room temperature is non-negotiable here; cold butter refuses to cream properly and will frustrate you into submission.
- Granulated sugar (2 cups): The sweetness that gets beaten into air, creating structure in your batter that supports the eggs and flour.
- Large eggs (4): These bind everything together and add richness; let them sit on your counter for 20 minutes before beating them in so they incorporate smoothly.
- Pure vanilla extract (1 tbsp for cake, 1 ½ tsp for frosting): The difference between good cake and cake that makes people close their eyes when they bite into it.
- Whole milk (1 cup for cake, ¼ cup for frosting): The liquid that keeps your cake tender and your frosting spreadable; room temperature milk blends more gracefully into batter.
- Powdered sugar (4 cups, sifted): Sift it before measuring or you'll end up with frosting that's thicker than intended and harder to spread.
- Sweetened shredded coconut (2 cups): This creates the fluffy texture that makes the bunny look alive; unsweetened coconut works but tastes less indulgent.
- Jelly beans or candy-coated chocolate eggs: These become the eyes and add whimsy; choose candies with colors that match your spring theme.
- Licorice strings: The whiskers that give the bunny personality and charm in a way no other decoration quite captures.
- Mini marshmallows: Soft and yielding, they become cheeks and a fluffy tail that guests can't resist nibbling before the cake is cut.
- Black edible gel or chocolate chips: A small dot of darkness makes those eyes come alive with expression.
- Pink food coloring: A few drops transform plain frosting into the inner ears and nose, bringing warmth to the bunny's face.
Tired of Takeout? 🥡
Get 10 meals you can make faster than delivery arrives. Seriously.
One email. No spam. Unsubscribe anytime.
Instructions
- Prepare your pans and heat:
- Preheat your oven to 350°F and get those two 9-inch round pans greased and floured; cold pans will shock your batter and you'll end up with dense edges. This step takes two minutes but saves you from heartbreak later.
- Combine your dry ingredients:
- Whisk the flour, baking powder, and salt together in a bowl, making sure everything is evenly distributed so no pockets of baking powder hide in the flour. This is meditative work, the kind that calms your hands before the real beating begins.
- Beat butter and sugar into clouds:
- In your largest mixing bowl, beat the softened butter and sugar for a full three minutes until the mixture looks pale and fluffy, almost like frosting itself. This beating is crucial because you're incorporating air that will make your cake rise and stay tender; rushing this step means a denser cake.
- Add eggs one by one:
- Crack each egg into the butter mixture and beat well before adding the next one; this slow integration prevents the mixture from curdling and ensures each egg is fully incorporated. Once all four eggs are in, add the vanilla extract and beat until everything looks smooth and creamy.
- Alternate flour and milk gently:
- Add the dry ingredients and milk in three additions, starting and ending with flour, mixing on low speed until just combined. Overmixing here develops gluten and makes your cake tough, so show restraint and stop as soon as you see no white streaks of flour.
- Divide and bake:
- Pour the batter equally into both prepared pans, smooth the tops with a spatula, and slide them into your preheated oven. Bake for 30 to 35 minutes until a toothpick inserted in the center comes out clean; the kitchen will smell like vanilla heaven and you'll be watching through the oven window like a proud parent.
- Cool with patience:
- Let the cakes rest in their pans for 10 minutes, then turn them out onto wire racks to cool completely. This resting period prevents the cakes from crumbling when you flip them, and cooling completely is essential before frosting or your frosting will melt into puddles.
- Whip the frosting:
- While the cakes cool, beat softened butter until creamy, then gradually add the sifted powdered sugar, milk, and vanilla, beating until light and fluffy. This frosting should look like clouds you could float on; if it's too thick, add a splash more milk, and if it's too thin, dust in more powdered sugar.
- Tint a portion pink:
- Set aside half a cup of white frosting in a small bowl and add a few drops of pink food coloring, stirring until you have a soft rose color. Don't go overboard with the coloring or it will look artificial; pale pink is far more charming than hot pink.
- Cut and arrange the bunny:
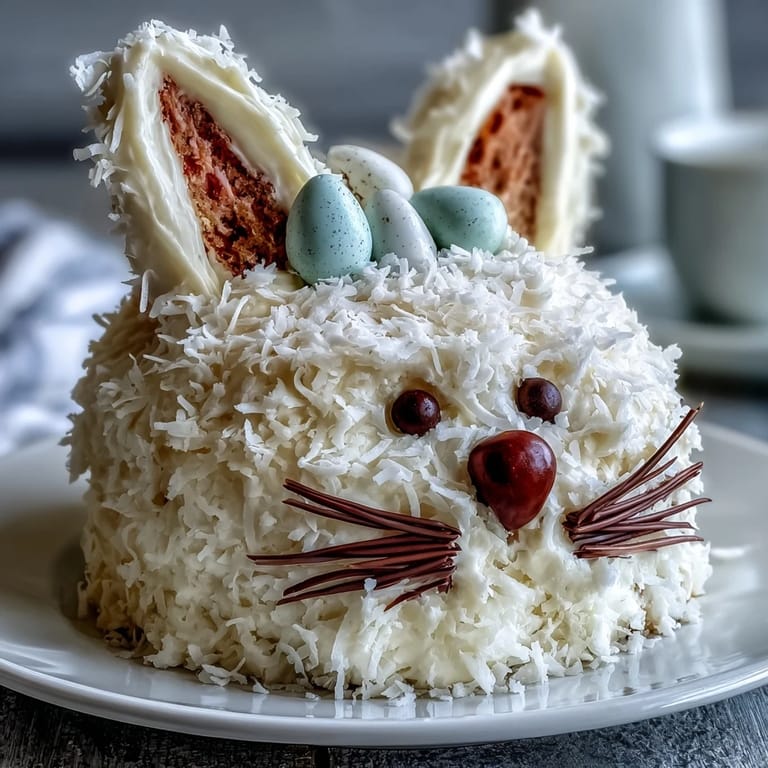
- Once cakes are completely cool, take one round cake and carefully cut it to form two ears and a bow tie using a serrated knife; the other round cake becomes the bunny's round face. Arrange the pieces on a large board or platter, positioning the ears above the face and the bow tie below, creating a whimsical bunny silhouette.
- Apply a crumb coat:
- Spread a thin layer of white frosting over the entire bunny shape to seal in crumbs, then refrigerate for 15 minutes. This step seems small but it's the difference between a messy frosting job and a professional-looking cake.
- Frost generously and add coconut:
- Cover the entire cake with a thick layer of white frosting, then immediately press shredded coconut over all the surfaces while the frosting is still soft. Work in sections if you need to, and don't be shy with the coconut; thick coverage is what makes the bunny look fluffy and alive.
- Add the pink details:
- Use the pink-tinted frosting to fill in the inner ears and create a little nose on the bunny's face, piping or spreading it carefully for a cheerful expression. This is where the bunny gets personality, so take a moment to make sure the nose is centered and the ears have even color.
- Decorate with candies and charm:
- Place jelly beans or candy-coated chocolate eggs for eyes, add a chocolate chip or dot of edible gel for the nose, press licorice strings into the frosting for whiskers, and top with mini marshmallows for cheeks and a fluffy tail. Step back and admire your creation before slicing; this bunny deserves a moment of appreciation.
 Save
Save The best part came when my son, who usually rushes through dessert, sat with his fork suspended in midair, staring at the bunny cake. He asked if it was wrong to eat something so pretty, and I realized right then that this cake was about more than sweetness and crumbs. It was about creating a moment where food became wonder.
The Magic of Shaping
Shaping this cake scared me the first time, but I learned that a serrated knife is your best friend when cutting those ears. The key is to cut slowly and confidently, letting the blade do the work rather than sawing frantically through the soft cake layers. Once you make that first cut, you realize the cake is far more forgiving than you thought, and the bunny shape comes together almost naturally on the platter.
Frosting Consistency Matters
The difference between frosting that spreads like butter and frosting that tears your cake apart comes down to temperature and patience. If your frosting feels too soft, chill it for 10 minutes and it will firm up just enough to cooperate. I learned this after one disastrous attempt where I grabbed warm frosting straight from the mixer and ended up with a frosting-covered cake that looked more like an avalanche than a bunny.
Variations and Personal Touches
This cake is a canvas for your creativity, and the decoration possibilities stretch far beyond what I've listed. Toasted coconut adds a nuttier depth if you want more complexity, and swapping the coconut frosting for cream cheese frosting creates a tangy contrast that some people prefer. I've also seen versions where people use fondant for smoother ears or piped frosting for more defined details.
- Toast your coconut in a dry skillet over medium heat for 3 to 5 minutes if you want a richer, more complex flavor that lingers.
- Make the cake layers the day before and store them tightly wrapped in plastic; this actually improves the cake by letting the flavors settle.
- Check all your candies for allergy information before decorating, especially if you're serving children who might have nut allergies.
 Save
Save This Easter Bunny Cake has become the cake my family requests now, not just for Easter but for spring birthdays and unexpected celebrations. It reminds me that sometimes the most memorable meals aren't complicated; they're just made with a little creativity and a lot of heart.
Recipe Questions & Answers
- → What ingredients create the cake layers?
All-purpose flour, baking powder, salt, butter, granulated sugar, eggs, vanilla extract, and whole milk combine to produce soft vanilla cake layers.
- → How is the coconut frosting prepared?
Butter is beaten until creamy before gradually adding powdered sugar, milk, vanilla extract, and shredded coconut to achieve a fluffy texture.
- → How do I shape the cake like a bunny?
After baking and cooling, one cake layer is cut into ears and a bow tie shape, then arranged around the face layer. A crumb coat seals the layers before final frosting and decorating.
- → What decorations enhance the presentation?
Pink-tinted frosting highlights inner ears and nose, while jelly beans, licorice strings, mini marshmallows, and edible gel or chocolate chips complete the bunny’s features.
- → Can the cake be made ahead?
Yes, cake layers can be baked a day in advance and stored wrapped to maintain freshness before assembly.
- → Are there alternative frosting options?
Cream cheese frosting can be used instead of coconut frosting for a tangy twist, or toasted coconut can replace sweetened shredded coconut for added flavor.